Showing posts with label How-To. Show all posts

Tuesday, December 19, 2017

Chocolate Treat Reindeer

Chocolate Treat Reindeer 
by Crafty Morning
I love finding and sharing with you fun and easy things to make.

Here is one perfect for Xmas.

Click HERE for Tutorial

Monday, December 11, 2017

How to Make a Professional Looking Bow

Create Beautiful Gift Wrapping with the Bow Tutorial
The link below will take you to a video on how to make beautiful professional looking bows to finish off your gift wrapping. Hallmark sure know how to make things look great.

Click HERE for How-To

Thursday, June 22, 2017

Easy to Sew Blanket Cushion

Easy to Sew Blanket Cushion
by Womans Weekly

Here is an easy to make cushion cover made from a blanket or throw. Minimum skills required. Video How-To included.

Click HERE for Instructions

Saturday, June 17, 2017

How To Create A Wicking Bed

How To Create A Wicking Bed from Apple Crates
by Fay


For the longest time I have wanted to grow my own vegetables. Due to circumstances too long to list here, I was unable to. So, when I bought my own home I knew this was the time. 

Luckily I have quite a bit of garden area to plant in, which I have done. I also had heard about the Wicking Bed method and thought I would give it a go. 

Wicking Bed Systems is a way to grow vegetables, etc in a sealed container (no drainage). The bottom half has a water reserve and the top half is soil. The idea is that you use less water as the soil wicks the water from the reserve below.

When I first heard about wicking beds there was not much information available online on how to arrange and set one up, but I did see someone had made theirs using an old apple crate.

In different parts of the world these large wooden crates are known by different names. I just call them Apple Crates as that is what I know them to be used for at the fruit wholesale markets.


I determined that my front yard was the best place for wicking beds as it is flat ground and receives long hours of direct sunshine. 

I wasn't sure where to get the apple crates, so I went to trusty old Google and searched for large wooden crates (in my area). Low and behold there was a company that had stock quite close to where I live. They also delivered them and set them into place where I wanted them to be. 

Funnily when the owner of the company asked me what I am going to plant and I told him I am turning them into wicking beds, he said "that will never work".
Well Mr Owner, 3 years later, they are working just fine that you very much!

I bought 3 and had them placed on the front lawn. Each one is approximately 1m x 1m x 1m. 


They came with the plastic sheeting on the sides but this is not of any use when making them into wicking beds, so it's ok if the crate you use doesn't have it.

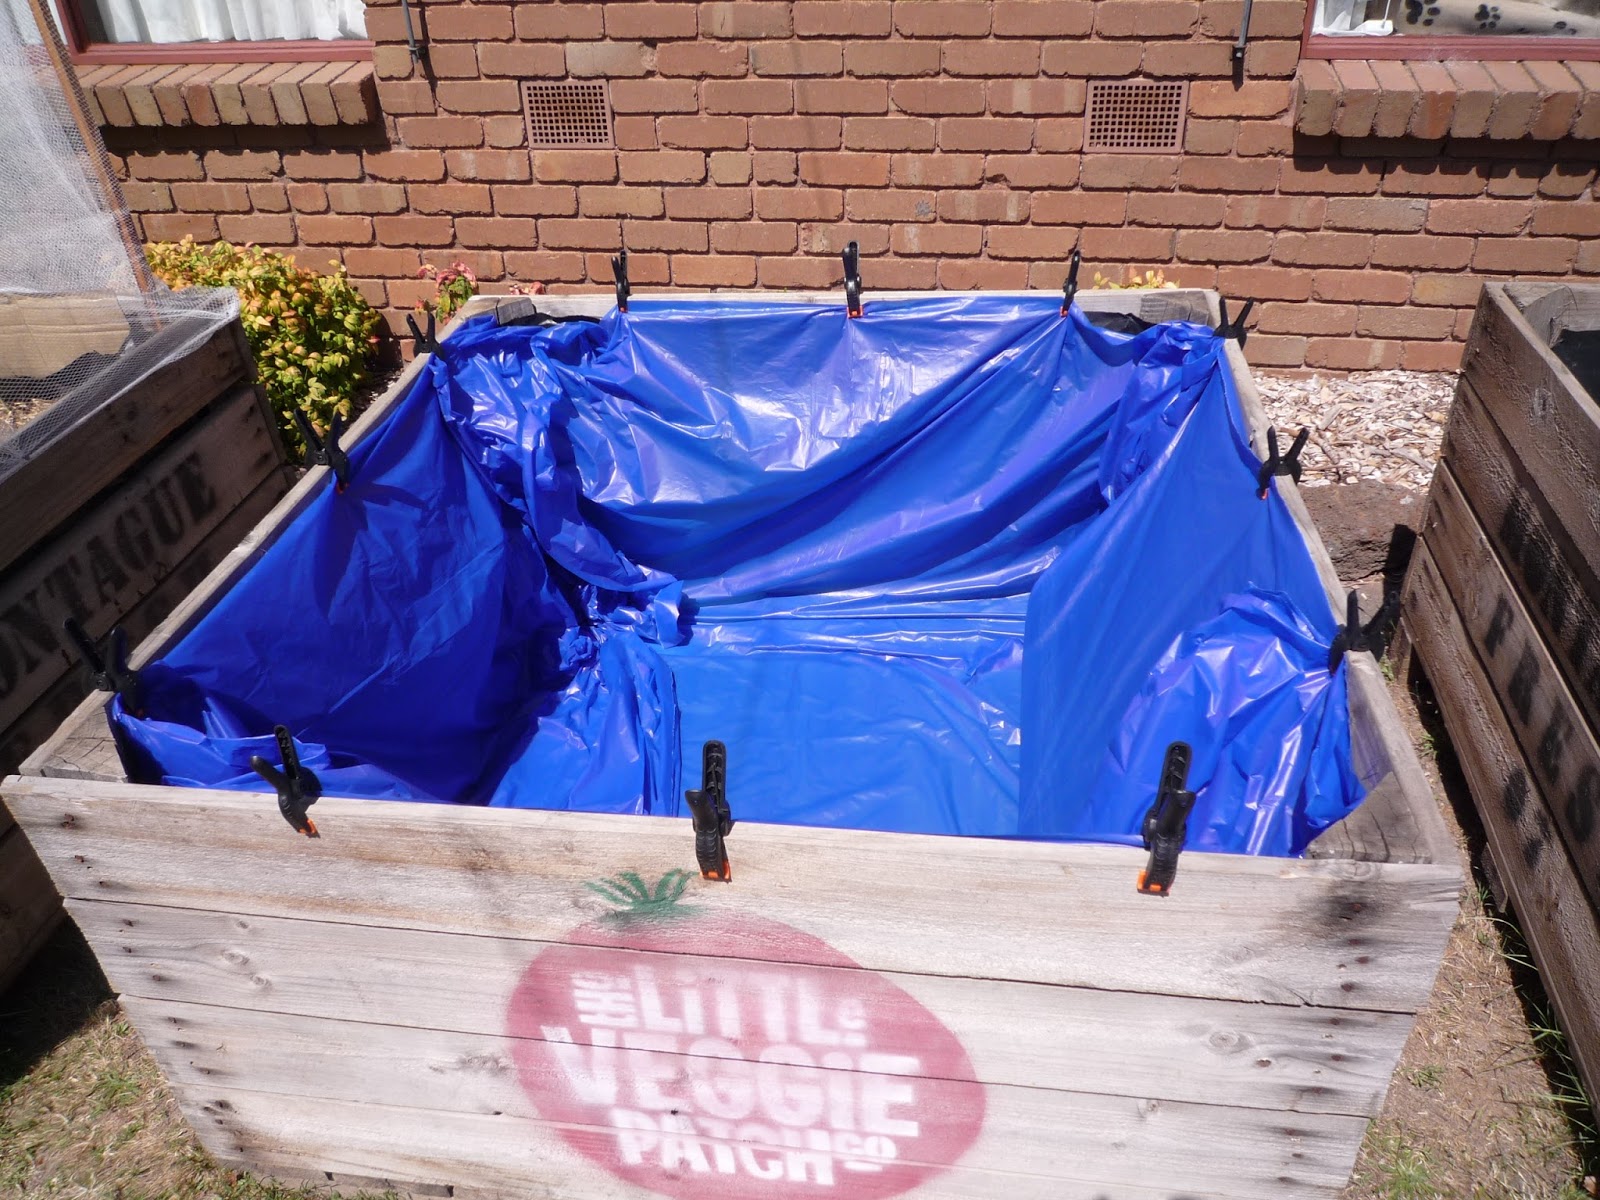
I first laid cardboard on the base and up the sides. This is to help protect the plastic sheeting / tarp you are going to use next from getting any splinters that could cause a possible leak. Make sure to use strong thick cardboard. I broke up heavy duty boxes.

For the first crate I used a cheap plastic drop sheet. It was not a good idea as they're just too thin.

My other two crates I used water-proof tarps.


This next part can be a bit tricky to do on your own. It can be done with patience but much easier with 2 people (4 hands).

You need to open out your water-proof protection and lay it in the crate so that the base and all sides are completely covered.

Clamps are helpful for keeping it in place while you are filling the crate. The clamps will not be needed once the crate is full.


You will need to calculate the squared metres of your crate so that you will know how much Scoria and soil to buy. My maths are not the best anymore, so once again I went to google.

You will need 300mm of Scoria and 300mm of good quality vegetable growing soil. I had read that this is a good depth for productive vegetable growth.

Scoria is a volcanic rock and available in different sizes. It's available from landscaping suppliers and large garden centres. 


I worked out the size I wanted, 20mm, and also calculated how much I would need to order to fill the 3 crates each to a depth of 300mm. 

The supplier can also work this out for you. Just give them the size of your crate and how deep you want it to be.


The best method that I found for getting the Scoria from the mound into the crate and spread evenly was to use a sturdy bucket. 

Pour slowly and NOT from high up; try to get nice and close to where you need the rocks to be. Spread out gently.

I found just using a shovel to be quite labour intensive and the rocks crashed down on the plastic.


When the Scoria is at a depth of 300mm and leveled out, then you need to lay out the watering system. That may sound complicated but it's super easy.

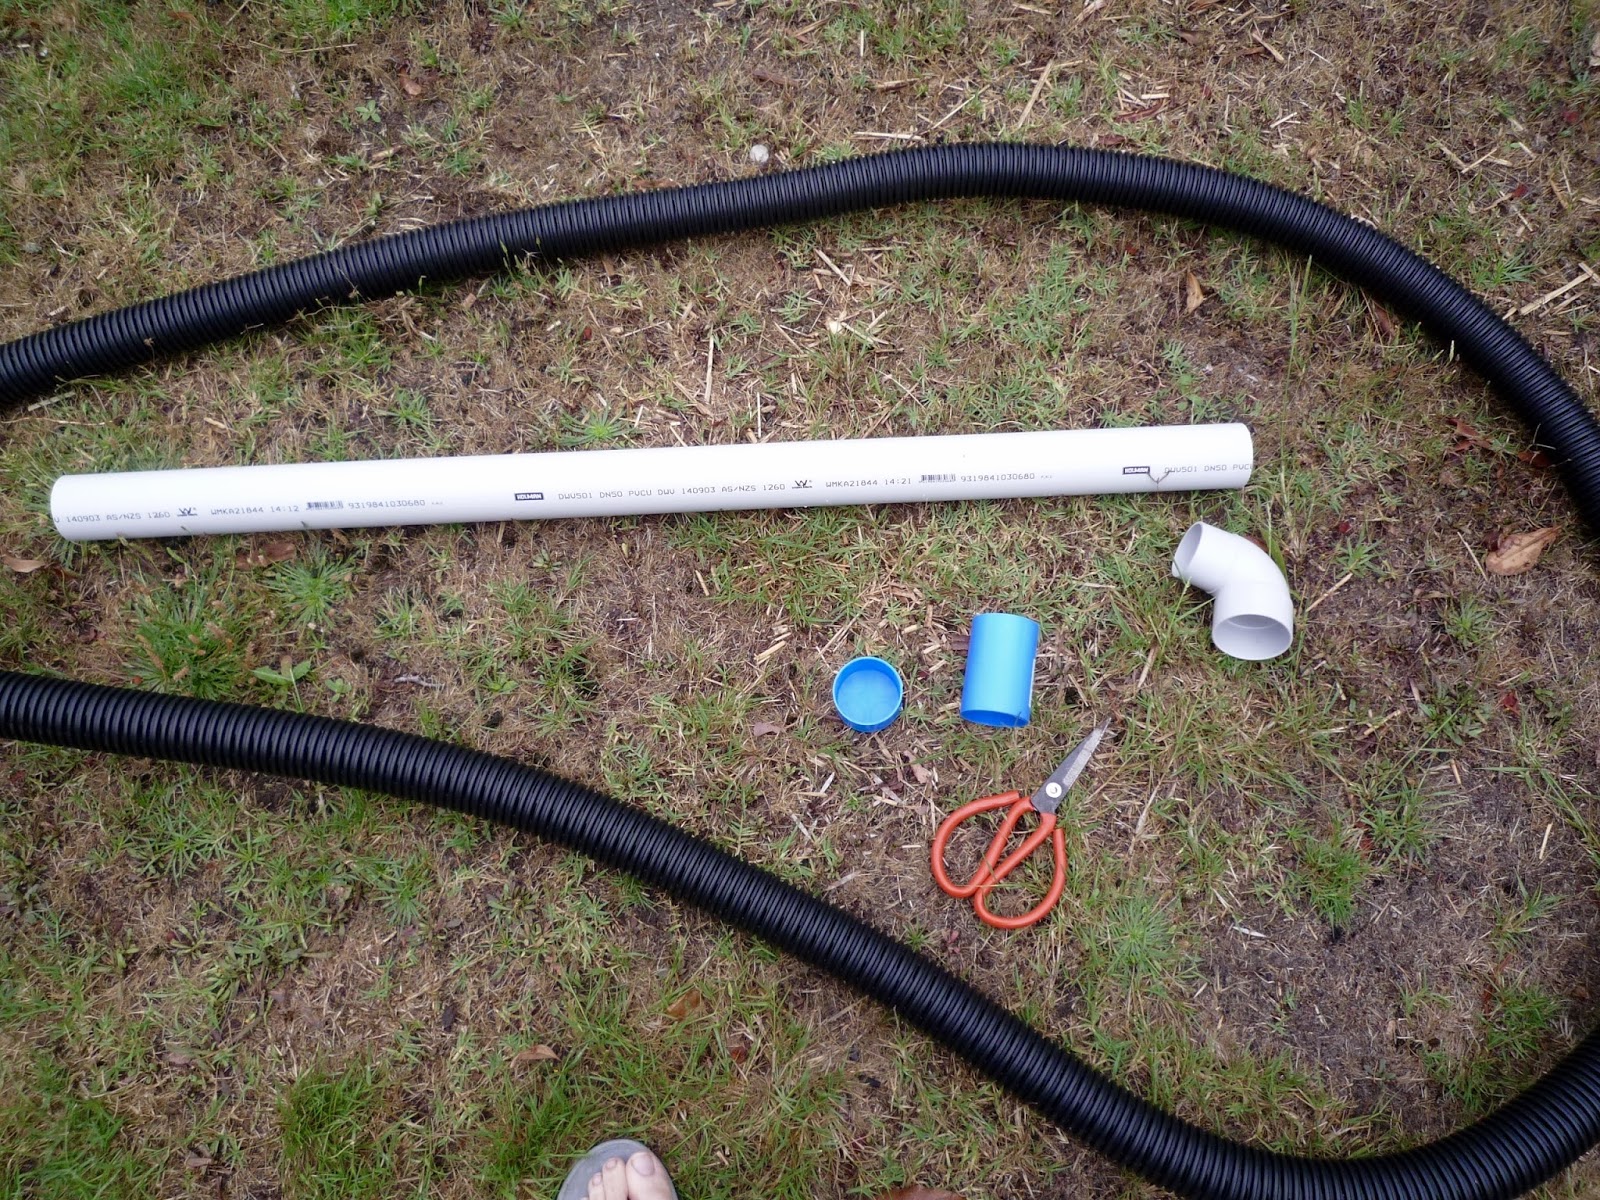
This is what I used:
Slotted Draincoil
600mm length of PVC Tube
90 degree PVC joining piece
Right-Angle Joining Piece
End Cap

Sizes, lengths and dimensions will depend on how large or small your crate is. I suggest you go to a large hardware store and you will find these items in the plumbing section. Just look and see which suits your situation the best. That is what I did.


The diameter of the pipe was different to that of the right angle bend joint fitting so I used a connector fitting to change the diameter. One end of this blue connector was the correct size of the pipe and the other end of this blue connector was correct for the right angle fitting. 


Attach the end cap to the end of the Slotted Draincoil pipe. 


Now just push all the pieces together, including the water filling tube (the upright PVC pipe). 

No glue is required if you bought the correct fitting sizes.


This  next part was what I would say the most difficult, but not really. As long as you have a Hole Bit for your drill then it's easy to do. Make sure to cut the hole through the crate and the plastic lining just above the Scoria.

The drainage hole is the over-flow for the Water Reserve. When water flows out of this tube, you will know that your tank it full.


This is the plumbing part that I used. I chose this method as it came as one piece. Alternatively, you can use a piece of hose or plastic tubing. Either method is fine.


Now fill the water reserve tank with water. Do it via the filling tube so not to disrupt the Scoria.

Always fill the tank this way. Re-filling will depend on the season and weather. I found that in winter I only rarely had to fill it and in summer about once every week or two.


Once the water reserve tank is full and you are happy with the progress so far, then you can proceed to the next part. It's better to check for leaks and mistakes at this point because once you fill the crate with soil it will be very difficult to rectify any problems.

You now need to place something over the tubing and Scoria to protect them from becoming clogged when the soil is added. 
Plastic is not an option, you need to use a material that will allow the water to be wicked up by the soil.

This is what I used.
Drain matting needle punched short fibre non woven geotextile


Roll it out in a single layer. Cut it to size so it fits your crate nicely and covers the Scoria completely.


Now for the final part of this tutorial I need to apologise. I didn't take photos of placing the soil.

All you need to do is add 300mm of good quality vegetable growing soil and plant seedlings or seeds of your choice. Once the crate is full, you can remove the clamps that were holding the lining in place.

Even though the water tank is full, it would be a good idea to lightly water the soil surface when planting new plants and seeds.


Do help protect plants, I constructed a frame from 2 lengths of electrical conduit pushing into the soil from corner to opposite corner, securing in place with a zip tie at the top of the overlapping conduits. I then draped insect netting over the top.


Friday, April 14, 2017

Bunny Folded Napkins for Easter

How To Fold Napkins to Look Like Bunny Ears


This project could not be any easier.
Click through for the PDF instructions so you can create this look for your table and thrill your guests.

Click HERE for Instructions 

Friday, March 3, 2017

DIY Trendy Painted Planters

DIY Trendy Painted Planters


Painted plant pots are all the rag at the moment and you can pay quite a lot of $$$ in designer stores. But why pay for them when they are so easy to make. Paint and create what you like for your home or as a wonderful gift.

Click HERE for Tutorial

Thursday, February 16, 2017

Small Space Storage for Utensils

Small Space Storage for Utensils

Not sure about you and your kitchen utensils but for me, even after I cut back my hoard, I still had quite a bit.

I didn't want to clutter my one and only utensil drawer so I looked around my kitchen to see where I could store them and still have easy access.

So, I thought why place them in a cupboard, why not have them hanging in easy reach. I found a narrow blank wall and off I went to measure the space.


Click Link Below to Continue

Tuesday, December 3, 2013

Monday, November 25, 2013

Tips and Tricks to Painting

Excellent Tips for Painting

by Dulux

Painting with glasses

If you wear glasses, simply cover the lenses with plastic cling wrap, and then when you peel it off, all the paint spots go with it.

Knobs and things

Always remove as much hardware as you can before you paint. Carefully scrape old paint out of screw slots before you try to unscrew them.

Paint spills

First, contain the spill from spreading. Scrape up as much paint as possible, working from the outside of the spill inwards to help prevent further spreading. Kitty litter can also be used to soak up paint.

Wet paint on carpet & materials

Most acrylic paints can be washed out of carpet & material so long as it is attended to immediately & the paint stains are kept wet. Rinse the affected areas immediately with water, sponge out & rinse with clean water. Detergent cleaners can also assist.
(Ensure that no diluted paint run off flows into sewer, stormwater or any natural waterways.)
Most oil-based paint can be thinned with mineral turps & then washed out with warm water & detergent, then rinsed with clean water.
Caution must be taken with the use of thinners & cleaning products. Do a small discrete test area on the affected material with the cleaner/thinner to ensure that it will not damage the material to be cleaned.

For paint spills that have dried

In some situations dry paint can be scraped off with a razorblade scraper (eg glass & glazed tiles). In most cases acrylic paint can be softened with methylated spirits which can aid in removal of the paint. Oil based paints dry harder; mineral turps may soften them if they have not fully cured. If methylated spirits or mineral turps do not affect dry paint spills, a paint stripper may need to be used.
For advice on paint strippers & paint removal products contact Selleys Customer Service on 1300 555 205.
Caution must be taken with the use of thinners & cleaning products. Do a small discrete test area on the affected material with the cleaner/thinner to ensure that it will not damage the material to be cleaned.

Unmasking

Always remove masking tape before the paint is completely hard so it won't chip and crack. Removing tape while the paint is still relatively wet will prevent most problems.

Stop mould

Lack of ventilation and moisture encourages mould growth. Exhaust fans and Dulux Wash & Wear Kitchen and Bathrooms can help prevent re-growth.

Clean start

Thorough washing with Selleys Original Sugar Soap will remove grease and dirt and ensure the best possible performance from the finish coats.

Mirror finish

For a superior mirror-like finish under gloss paints use Polyfilla Mirror Finish. It is smooth and easy to apply. It has excellent adhesion to timber, plaster, concrete, mortar and primed metal. Mirror Finish comes in two convenient sizes, 425gm and 950gm.

Paint pads

Painting hallways can involve many architraves and skirtings. It's a good time to think about trying out a paint pad. These little foam pads with wheels can really speed up the job, taking the fuss out of edges.

First stop

Paint exterior doors and windows early in the day and prop them open to dry, and they will be ready to close by nightfall.

Little things

An artists brush, instead of a house painting brush will help you pick out small details in extra colours quickly and neatly.

Time travel

Gently scraping the paintwork can reveal your home's colourful history and give you some original colour ideas.

Cool tip

If you are using water based paints, on a hot day, spraying walls with water before you paint will cool them down and make the job faster and easier - you can even paint them when they are damp.

Painting over glossy enamels with acrylics

Make sure that the old painted surface is clean and sound. Gloss enamels should be sanded to a flat finish, before you repaint with an acrylic. If you are using a flat or low sheen acrylic finish, an undercoat may not be necessary. If a gloss or semi gloss were to be used, an acrylic undercoat would be necessary to fill any imperfections left by the sanding. Lightly sand the undercoat to give a smooth flat finish.

Checking if your old paint is sound

The best way to find out if your old paint is sound, and ready to be repainted, is to test the paint in several areas by cutting a small cross with a sharp knife and press 10cm or so of adhesive tape firmly across the middle of the cut. Rip it away quickly after a few minutes and if any pieces of paint come with it you'll need to strip away the loose paint. If the paintwork has failed the adhesion test or is heavily layered, it should be stripped back to a firm clean base before repainting.

Using Dulux topcoats and preparation products

You should always use Dulux topcoats in conjunction with Dulux preparation products. Manufacturers make their paints to work together. We have no control over the products of other manufacturers, so mixing brands will void any warranties.

Yellowing

All oil based paints share the problem of yellowing. White oil based paints in particular are more noticeable.
Yellowing is caused during the ageing process and it is particularly prevalent where enamels dry in the dark, in high humidity or if there is poor air circulation. A good example of yellowing is where a sliding door is left in the cavity - it will yellow if it is not exposed to sunlight. Yellowing may be evident sooner if enamels are allowed to dry in the same area where most water based paints are drying. Ideally you should allow 2-3 days for water-based paints to dry before painting enamels in the same area. The only way to be sure that your white painted surfaces won't yellow is to use an acrylic (water-based) paint.

Painting kitchen cupboards

Laminex® and Formica® are brand names of products commonly used in kitchen benches and cupboards. Dulux PrepLock Shellac Base is a rapid drying preparation paint which is perfect for painting ceramic tiles and melamine without the need to sand first. Dulux recommend PrepLock and a top coat of either Dulux Aquanamel or Dulux Super Enamel for cupboard surfaces. We do not recommend painting of work surfaces such as bench tops.

Painting gutters and fascias

The best product for these areas would be Dulux Weathershield Gloss.

Painting decks

Dulux recommends Dulux Weathershield Low Sheen for decks. If you require a timber oil or stain we recommend Cabot's decking oil or stain. Visit the Cabot's website at www.cabots.com.au.

When droplets appear on acrylic paint

Don't panic! Sometimes, when acrylic paints are drying, small light coloured droplets will appear on the surface. This usually happens if newly painted surfaces are exposed to moisture, either by dew, high humidity, or rain on the outside, or steam etc. on the inside. These droplets cause no downgrading of the paint film's durability. They only affect the appearance. Wash the surface with sugar soap, and then rinse with plenty of water. Sometimes droplets may continue to appear for a time and will need wiping down until they stop. These droplets are a surfactant, which is drawn to the surface by moisture.

Longevity of paint in storage

How long paint lasts in the can depends on how well it was stored. Paint lasts the longest time when the can is full, well sealed and has been stored in a cool dry place (not a damp garden shed!) Some paint types will last longer than others.
To check an old can of paint, open it, stir it well and apply it to a test area. Does it smell like paint? Is the consistency of the paint neither too thick nor too thin (like single cream)? Does the test area dry in the time indicated on the can? If the answer is yes to these questions, then your paint is probably fine.

Paint Calculator - It works out how much paint you will need

Paint Calculator - It works out how much paint you will need
by Dulux
 

Click HERE to access the Calculator

Sunday, November 24, 2013

Toothpick Christmas Tree Gift Tag

Toothpick Christmas Tree Gift Tag                            By  at One Dog Woof

Use cut up toothpick segments to create a Christmas Tree: Homemade Christmas Gift Tags. Instructions at www.1dogwoof.com

Click HERE for How-To


Sunday, October 27, 2013

Knit a Giant POUF Floor Cushion

Knit a Giant POUF Floor Cushion
by Pickles
 
Click HERE for Pattern

Friday, October 25, 2013

Saturday, October 19, 2013

Thursday, October 3, 2013

Light Up Ghosts for the Front Yard

Light Up Ghosts for the Front Yard
via Spoonful
Cagey Ghosts

Click HERE for Instructions

Wednesday, September 25, 2013

Monday, September 23, 2013

Ghoul Favor Cups - 30 days to Halloween - Day 9

Ghoul Favor Cups - 30 days to Halloween - Day 9
by bhg.com
Click HERE for Instructions